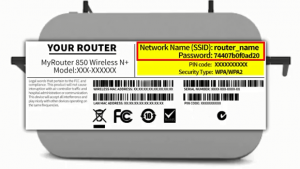
• Before you start, you will need to gather the following information about your wireless network in order to connect your machine:
1. The SSID or Network Name of your router or access point
2. Your Network Key or password.
The default settings for your router or access point can be found on the equipment label.

If your SSID or Network Key contain both uppercase and lowercase letters be sure to record them as both of these credentials are case sensitive.
If you have setup up a custom SSID and Network Password and cannot recall this information, you will need to contact your router manufacturer or Internet Service Provider. Setup cannot be completed without this information.
• Setup Google Cloud Print on your Brother Device. Have your Google account information handy for this step.
1. Press the Wi-Fi icon on the touchscreen.
2. Select “Setup Wizard” from the option list.
3. Manually add your network name if it is set to hide.
4. Select your SSID or Network Name
5. Press “OK”
6. Enter your Network Key using the touchscreen.
7. Confirm that your Network Key is correct …and press “OK”
8. Once the wireless connection is made press “OK”
• Next you will need to setup your machine on your Google account
1. Open the Google Chrome browser on your computer
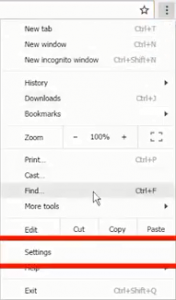
2. Click the menu icon.
3. Choose settings

4. If you are not already logged in, log in to your Google account
5. From the settings menu, click on the “show advanced settings” option.
6. Scroll to the Google Cloud Print heading
7. Click on the “Manage” button.
8. Under the New Devices heading there will be a list of printers on your network that are currently not connected to Google Cloud Print. Select the model you wish to connect and click “Register.”
9. Click “Register” again to confirm your registration.
10. If you are prompted by your Brother machine to confirm the registration, Press “OK.”
Your printer should now display under the My Devices heading. Your Brother machine is now ready for cloud printing.