The message “Unable to Initiate” with a two digit code will typically appear for one of two reasons. Either a foreign object, such as a paper clip or ripped piece of paper, is stuck in the machine or there is a mechanical malfunction.
Please note that even though your printer model is not mentioned here, the following steps may still be applicable for your model of Brother Printer.
The following steps may help to clear the “Unable to Initiate” error:
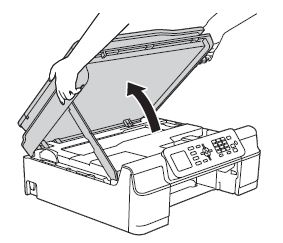
1. Using both hands, use the finger holds on each side of the machine to life the scanner cover into the open position.

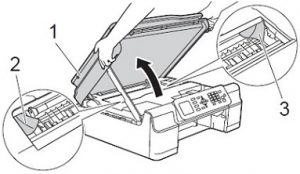
2. Carefully check the left (2) and right (3) hand corners and the center inside the machine and remove any paper scraps that may be jammed or other foreign objects in this area.

3. Using your hand, move the print head from left to right, checking carefully for any paper scraps stuck under the print head. Remove any if found.
• If the print head is in the right-hand corner, press and hold Stop/Exit for at least 5 seconds until the print head moves to the middle. This will allow you to check the right corner inside the machine for any paper scraps.
4. While keeping the scanner cover open, turn the machine around so you are looking at the back of the machine.
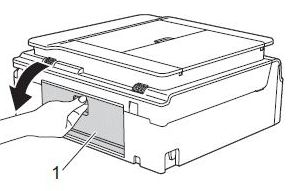
5. Open the Jam Clear Cover (1) on the back of the machine.

6. Check inside for and remove any foreign objects or jammed paper.
7. Close the Jam Clear Cover, then turn the machine back around to the front.
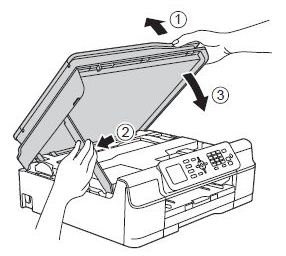
8. Lift the flat-bed scanner cover to release the lock (1), then gently push the scanner cover support down (2) and close the scanner cover (3) using both hands.
• If “Unable to Initialize” is still on the display, proceed to step 9.
• If “Unable to Initialize” has cleared, proceed to step 12.

9. Unplug the machine from the power outlet and wat for approximately one-minute before plugging it back in.
• If “Unable to Initialize” still on the display, proceed to step 11.
• If “Unable to Initialize” has cleared, proceed to step 10.
10. Print a Print Quality Check Sheet (PQCS).
a. Press Menu.
b. Press ▲ or ▼ to scroll through the menu list to select Ink. Press OK.
c. Press ▲ or ▼ to scroll through the menu list to select Test Print. Press OK.
d. Press ▲ or ▼ to scroll through the menu list to select Print Quality. Press OK.
e. Press Color Start. A PQCS will print.
• If the PQCS prints successfully, your machine is working properly and the issue has been resolved.
• If the PQCS doesn’t print because “Unable to Initialize” error reappears and you have cycled the power, continue to step 11.
11. Your machine will require service. If the printer is still under warranty, you will need to contact the manufacturer directly to troubleshoot the problem.