The problem: when trying to print an ‘Install Cartridge’ error message displays on the printer control panel or computer software, or the attention light blinks on the printer. With HP color laser printers, the color of the cartridge with the issue should be indicated in the error.
This error message indicates that a toner cartridge is not installed, not installed properly, or an obstruction is preventing the toner cartridge from being recognized.
If the specified toner is not installed, install a toner cartridge to clear and prevent this message from displaying. If a toner cartridge is installed and the message displays, use the following steps to fix the issue.
Step 1: Check for packing materials and paper
Check the toner cartridge and printer for any packing materials and paper that might be causing the error message.
1. Turn off the printer.
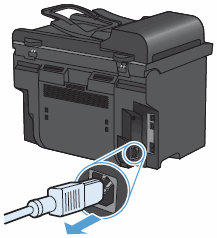
2. Disconnect the power cord from the printer.
3. Open the toner cartridge door
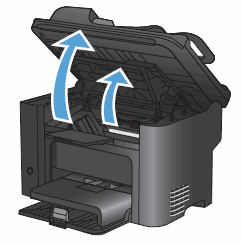
4. Look for and remove any packing material such as cardboard, tape, or paper debris
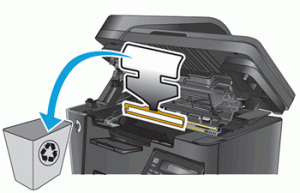
5. Remove the toner cartridge.
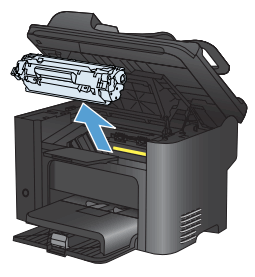
6. Look for and remove any additional packing material or paper debris inside the toner cartridge area.
7. Check for and remove the orange tab on the toner cartridge.
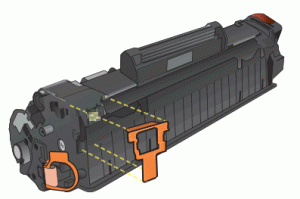
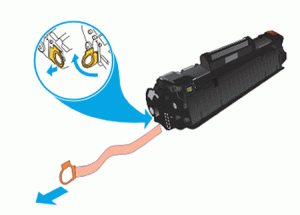
8. Check for and remove the protective sealing tape on the toner cartridge.
To remove the protective sealing tape, pull the tab away from the toner cartridge, and then discard.
CAUTION: If toner gets on your clothing, wipe it off with a dry cloth and wash the clothing in cold water. Hot water sets toner into the fabric.
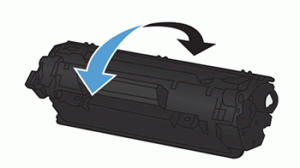
9. Gently rock the toner cartridge from front to back to make sure the toner is distributed evenly.
10. Insert the toner cartridge into the printer, and then close the toner cartridge door.
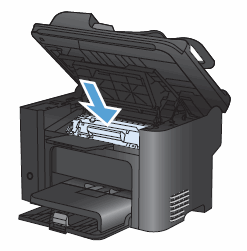
11. Reconnect the power cord, and then turn on the printer.
If checking for and removing packing materials and paper did not resolve the issue, continue to the next step.
Step 2: Check the printer for additional jammed paper
Jammed paper or debris might cause the error message. Checking other areas in the printer where jammed paper occurs might resolve the error message. For detailed instructions on clearing a paper jam from your printer, check your owner’s manual or go to HP Customer Support. Type your printer model, and then search for “paper jam” under the Troubleshooting tab.
If you did not find a paper jam or clearing any excess paper did not resolve the issue, continue to the next step.
Step 3: Clean the electric contacts on the toner cartridge
The toner cartridge might have a faulty connection to the printer. Use a lint-free cloth to clean the toner cartridge contact.
1. Open the toner cartridge access door.
2. Remove the toner cartridge from its slot.
3. Use a lint-free cloth to wipe the toner cartridge contact on the top left of the toner cartridge.
NOTE: Coffee filters work well if a lint free cloth is not available.
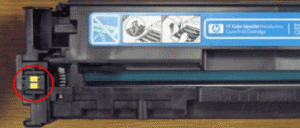
4. Insert the toner cartridge into its slot, and then close the toner cartridge access door.
If cleaning the contacts did not resolve the issue, continue to the next step.
Step 4: Reset the printer
Sometimes an error message persists even though there is no packing material or jammed paper inside the printer. Resetting the printer might resolve the error.
1. With the printer turned on, disconnect the power cord from the printer.
2. Unplug the power cord from the power source.
3. Wait 60 seconds.
4. Reconnect the power cord to a wall outlet and to the printer.
NOTE: HP recommends plugging the printer directly into a wall outlet.
If resetting the printer did not resolve the issue, continue to the next step.
Step 5: Replace the toner cartridge
If the previous steps did not resolve the issue, replace the toner cartridge with a fresh toner cartridge to rule out a faulty cartridge.
If replacing the toner cartridge did not resolve the issue, continue to the next step.
Step 6: Service the printer
If the error message continues and you have tried all the other steps without a resolution, your printer may need service. Please contact our Service Department at 760-431-3756 to schedule an appointment for your printer repair.