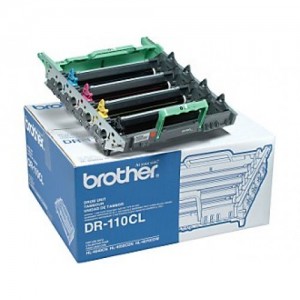
 Many printers today (especially Brother and Dell printers) have a two-piece cartridge system consisting of a toner and a drum. Even though the unit has a one-piece appearance, there are two pieces that can be separated. The drum unit is the plastic “tray” with a shiny cylinder that the toner cartridge sits in. To remove the toner from the drum unit, simply push down on the blue/green plastic lever and gently pull the toner out. As you will not need to replace the drum every time you replace your toner cartridge, your drum will eventually need replacing.
So how can you tell if your drum needs to be replaced? You should replace it when your image quality declines and does not improve even after changing your toner. Or simply replace your drum when your printer notifies you to do so. When the replace drum light or message comes on, your printer might stop working without much notice. However, most printers will continue to work with the replace drum warning long after the light comes on. It is best to be prepared and keep a drum on hand as a back up. Most drum units are good for about 3 toner replacements. You can extend the drum life and keep it clean by occasionally cleaning the corona wire. You can simply do this by sliding the little plastic piece attached to the corona wire back and forth a couple of times.
After you replace your drum, don’t forget to reset it. If you don’t reset your drum, your printer might continually display replace drum unit message and might not work properly. By resetting your drum, you are simply resetting the counter so that your printer knows to give you a notice again when the time comes to replace your next drum unit.
If you need help resetting your drum or for any other drum unit related questions, please give us a call and we will be happy to assist you.