When running jobs with your Brother printer, poor print quality can occur for a variety of reasons, many of which have very simple fixes. With a little detective work, and the following tips for particular issues, you could have your printer back to putting out perfect prints in no time.
Step one: Make certain that you are using paper that meets your printer’s specifications, and that your print settings are set to the print media that you are using. For example, printing on labels without changing your printer’s paper setting to labels will likely cause issues with the toner fusing to the page properly leading to messy, low quality prints.
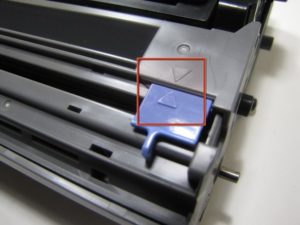
Step two: Check to ensure that the toner cartridge and drum unit are both installed correctly and that the corona wire tab is in the resting position, situated to the far side and matching up the arrows.
Step three: Print a test page. This option can usually be found in your machine’s Menu via the display. Refer to your printer’s User Manual for specific instructions for your particular model. If the test printout looks good, the issue is very likely not the machine. If the test page has a quality problem, check for your particular issue and follow the recommendations to try and solve the issue.
Faint Prints:
- Check your toner’s life status. If the toner indicates that it is low or the printer indicates that it needs to be replaced, install a new cartridge.
- Where is your printer located? Conditions such as high humidity and temperatures, including direct sunlight may cause this issue. Moving your printer to a cooler, more dry location can help to solve this issue.
- If the whole page is printing faintly, check your print settings in the Menu to see if “Toner Save” has been turned on and turn it off.
- Clean the corona wire on the drum unit.http://www.toner-inkjet.com/B2B/how-to-clean-corona-wire-on-brother-drum-unit/
- Replace the drum unit with a new one.
Gray Background:
- Where is your printer located? Conditions such as high humidity and temperatures, including direct sunlight may cause this issue. Consider moving your printer to a cooler, more dry location can help to solve this issue.
- Replace the toner cartridge with a new one
- Replace the drum unit with a new one
Ghosting Images:
- Where is your printer located? Conditions such as low humidity and temperatures may cause this issue. Consider moving your printer to a location with more moderate temperatures.
- Ensure that you have selected the correct media type for the type of paper you are using.
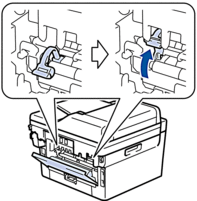
- Make certain the two green levers inside the back cover are in the up position. If not, pull up the two green levers until they stop.
- Replace the drum unit with a new drum unit.
- Replace the toner cartridge with a new toner cartridge.
- The fuser unit may be contaminated. Contact us at 760-431-3756 to schedule service.
Toner Specs on the Page:
- Ensure that you have selected the correct media type for the type of paper you are using.
- This is common when the drum unit has reached the end of its life. Replace the drum unit with a new drum unit.
- The toner cartridge may be damaged. Replace the toner cartridge with a new toner cartridge.
- The fuser unit may be contaminated. Contact us at 760-431-3756 to schedule service.
Lines across the Page:
- Ensure that you have selected the correct media type for the type of paper you are using.
- This is common when the drum unit has reached the end of its life. Replace the drum unit with a new drum unit.
White spots on black text or Black spots:
- Check to ensure that the drum unit doesn’t have any foreign material such as glue from a label suck on the surface of the drum. Clean and remove any that you find.
- This is common when the drum unit has reached the end of its life. Replace the drum unit with a new drum unit.
Black lines down the page:
- Clean the corona wire on the drum unit.
http://www.toner-inkjet.com/B2B/how-to-clean-corona-wire-on-brother-drum-unit/
- The toner cartridge may be damaged. Replace the toner cartridge with a new toner cartridge.
- This is common when the drum unit has reached the end of its life. Replace the drum unit with a new drum unit.
- The fuser unit may be contaminated. Contact us at 760-431-3756 to schedule service.
White lines down the page:
- Check to ensure there is no foreign material such as a torn piece of paper, sticky notes or dust inside the machine and around the toner cartridge and drum unit.
- The toner cartridge may be damaged. Replace the toner cartridge with a new toner cartridge.
- This is common when the drum unit has reached the end of its life. Replace the drum unit with a new drum unit.
Poor Fixing (toner on the page is dusty):
- Ensure that you have selected the correct media type for the type of paper you are using.
- Make certain the two green levers inside the back cover are in the up position. If not, pull up the two green levers until they stop.


